Importing & Exporting CGM Files
Steps:
- Import a CGM File
- Create New Space in a CGM Document
- Augment Your CGM Illustration & use the Smart Vector Fill Tool
- Add Dimensioning, Annotations & Text to CGM
- Import a Raster Image into CGM, & Change Its Opacity
- CGM Export - the Camera Tool.
- CGM Export to PDF
- CGM Saving to CGM
- Export from CVX (Canvas Native) to CGM
- Export to WebCGM
Introduction:
Computer Graphics Metafile (CGM) is a free and open international standard file format for 2D vector objects, raster images, and text. It's widely used in engineering, aviation, manufacturing, the oil industry, and other highly specialized technical workflows.
Canvas' CGM*PIP (Petroleum Industry Profile) and CGM*ATA (Air Transport Association) import filters make it easy to import CGM files from specific workflows. The CGM*PIP technological standard is designed for working with files from UNIX-based seismic interpretation applications, and Canvas' CGM*PIP import filter allows for the importing of raw seismic visual data. This can then be analyzed, visually augmented, annotated, edited manually or numerically, and then combined with professionally formatted text in a multi-page document ready for sharing. The CGM*ATA specification promotes interoperability among users in the aerospace industry, and Canvas' filter allows for full integration into those work environments as well.
You can also continue to work on an edited CGM file in its original UNIX-based workflow, AFTER you've augmented it with Canvas' powerful graphics tools.
In This Tutorial
In this tutorial we will: import a standard CGM graphic file into Canvas, while exploring some of its import dialog options (in our case this will be a manufacturer's schematic, but you can use a file that best suits your own workflow); enlarge a document so there's space for annotations and dimensioning; select all in the Document Layout palette; temporarily create a group object in order to re-position an entire illustration; visually augment and edit a "highlighted" portion of the illustration; use the Smart Vector Fill tool to highlight another portion of the illustration; add dimensioning, annotations and text; import and edit a raster image; quickly render a "snapshot" of an illustration with the Camera Tool; export to .PDF; export to WebCGM; export to CVX; and finally, we'll save our CGM illustration file for continued work in other CGM applications.
Note that many more Canvas-CGM export options are available via the File | Save As dialog box, in the Save As Type drop-down list.
Also, please note that this tutorial only touches on the many ways you can augment a CGM file in Canvas' powerful graphics environment. Likewise, the editing techniques you'll see can also be used in non-CGM illustrations.
Should I Work in CGM, or in CVX?
You don't need to convert a CGM file to Canvas' native CVX format in order to work on it in Canvas. Immediately after you've opened a CGM file in Canvas, look at the very top of your Canvas computer display (its GUI) and you'll notice that the file name still ends with ".CGM," meaning it's still in that format, unaltered. You can then work on it in Canvas' rich graphics environment, save it, and continue to work afterwards with the same file in other CGM applications.
Optionally, you can also decide to convert the file after opening it in Canvas, to Canvas' native CVX format (File | Save As, and in the Save As Type drop-down list choose CVX - Canvas). When you're finished your work in CVX format you can then choose to export the file back to its original CGM, with its original high level of precision coordinates intact.
Whether or not you choose to work in CGM or CVX, when you're done work in Canvas you can export to many different formats and presentation media (see below for some examples).
 Tip:
Tip:
- There are a few advantages to converting to CVX format. For example, you can use the Multi-Save feature, allowing you to save to multiple formats with one click (File | Save As, then check beside Multiple Save in the Save As dialog box).
Step 1: Import a CGM file
Importing a standard CGM file from a general manufacturing workflow, with an exploration of some of Canvas' CGM import options.
To import your CGM file:
- Click File | Open, find your CGM file, then click Open.
- In the CGM/CGM Import Options dialog box, choose from a variety of options:
- The Seismic Options section of the dialog is of special interest if you're importing a CGM*PIP file. There you can choose to Import Only Raw Seismic Data. Also, the Interpolation drop-down list offers options to help with the analysis of seismic data in graphic form.
- The Render Options section of the dialog lets you render any object-based graphics at the point of import, if you wish to work with Canvas' full range of raster image editing capabilities.
- The Scale Input part of the dialog lets you open the file at a convenient zoom level. Choose Automatic to One Page to scale a CGM illustration so it fits the dimensions of your current Canvas document.
- The Font Match button lets you control how fonts will appear after importation into Canvas.
- Select CALS Compliant (Computer-aided Acquisition and Logistics Support) to conform to the U.S. Department of Defense's standard, which is a strategy for integrating processes and migrating from hardcopy technical documentation to paperless delivery (often used in the aerospace industry).
- Click OK
Tip:
- In Canvas, many traditional raster image effects can also be applied to vector objects using Sprite Effects. See: Window | Palettes | Sprite Effects.
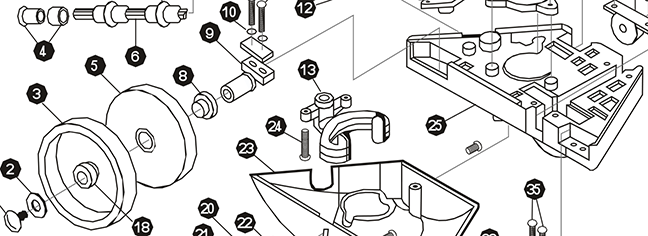
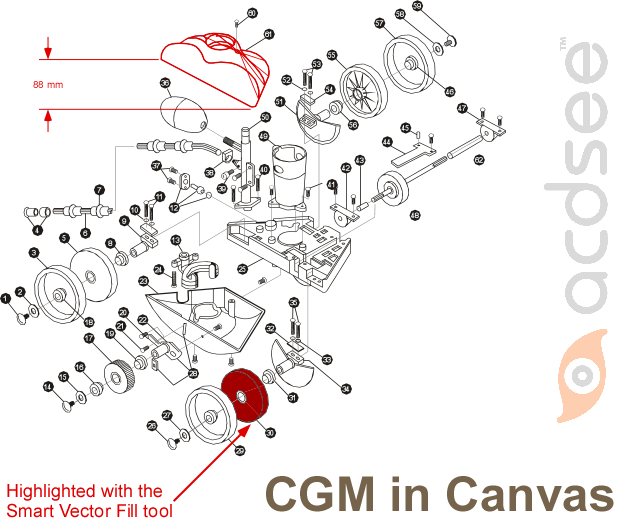
For this tutorial's CGM file we're using an example from the general manufacturing industry, in this case a manufacturer's schematic of a vacuum pump that's made up entirely of vector objects.
Step 2: Create Space in a Document
 A common problem when you’ve imported a technical illustration into Canvas from another application (such as a CGM file or CAD file), is that the illustration will go right to the edges of the document. This leaves no extra room for the dimensioning, annotations, text, and other graphic elements that you may want to add in Canvas. Here's how to create some extra white space in your document to make room for additional information.
To re-size your document:
- If necessary, make sure nothing is selected by hitting the Esc key twice (this way your document's page properties and formatting options will appear in the Properties Bar).
- In the Properties Bar, enter the Paper Width and Paper Height with the aim of adding some white (empty) space to the document. With our document, we're going to enlarge it to 11 x 8 inches, as this will also help if we want to print to a standard paper size later on.
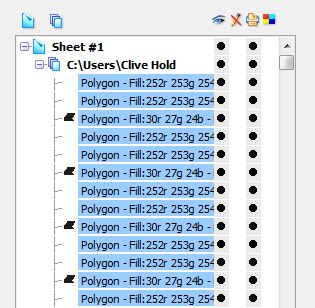
- Open the Document Layout palette (Window | Palettes | Document Layout).
- Expand the "sheet" and "layer" (the + signs) to show all of the graphic elements.
- To select every object, image, and other graphic element in the illustration: click in the Document Layout palette on the top graphic element in the layer; then Shift + Click on the bottom graphic element shown in the layer (scroll down if necessary).
- Now it's a good idea to double check that every element's been selected by scrolling up and down (if any are unselected, Control + click on each one).
- In the Properties Bar, click the Group button (above your work area, towards the right). This will create an easy-to-manage, single "group object" out of your entire illustration.
- Open the Align palette (Windows | Palettes | Align).
- Choose the Horizontal and Vertical Center commands, plus Align to: Document, to center the group object on the page.
- Click Apply.
- To ungroup your objects: select the group object you made above and click the Ungroup button in the Properties Bar.
Tips:
- In Canvas, the Properties Bar is "context sensitive." This means it's continually updating with commands, menus, and live coordinates that relate to the kind of object, image, text, or tool that's currently selected. It's a good idea to get in the habit of looking to the Properties Bar to see if what you need is there.
- Many of the tools discussed in this tutorial are also available via the Toolbox (Window | Toolbox | Show Toolbox).
- Some of the Preset palette's main attribute commands are also accessible via the icons in the bottom portion of the Toolbox (click + drag on any of them to instantly float the whole Preset palette).
Step 3: Augment Your Illustration & Use the Smart Vector Fill Tool
 The emphasis in this tutorial is on importing and exporting CGM files. However, we're also including a few examples of how you might augment a CGM file as part of your workflow. This is only a glimpse of what you can do in Canvas as part of a CGM file's development.
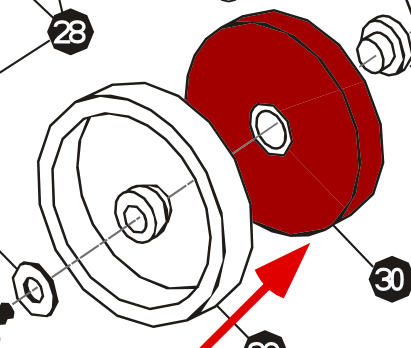
To begin, we're going to "highlight" two portions of an illustration, using graphics tools to make them stand out from the rest of the illustration.
To highlight vector objects:
- Press Esc twice (to ensure that nothing's selected) and choose your Current Attributes in the Presets palette. This means choosing the fill ink, stroke ink, stroke width, and dash style, which will affect how your highlighting appears.
- Select an object that you want to highlight (to select multiple objects, shift + click to select each object).
- Open the Presets palette (Window | Palettes | Presets).
- Change the visual attributes of your selected object(s) so that they stand out from the rest of the drawing (for example, change the stroke ink to red).
- To highlight a second part of the same illustration, choose the Smart Vector Fill tool (Window | Toolbox | Smart Vector Fill).
- Click in an object, or enclosed region within an object, to add the Current Fill Ink.
Tips:
- You made need to zoom-in using the Magnifying Glass tool to do more complex selections: (Window | Toolbox | Magnifying Glass Tool, then click + drag around the area you want to magnify).
- Reminder: this might be a good time to save your progress (File | Save).
Step 4: Add Dimensioning, Annotations, and Text.
Adding dimensioning lines and numbers, explanatory annotation labels, and title text to our document: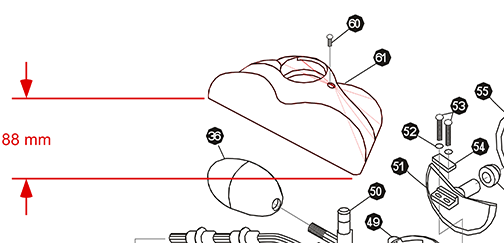
To choose your Current Attributes:
- Select the Linear Dimensioning tool (Window | Toolbox | Dimensioning | Linear Dimensioning Tool) and click on the edge of your object as directed by the tool tips. Using the Linear Dimensioning tool, the cursor will say "Click 1st Point" and "Click 2nd Point" and these should take place at two, measurable edges of the first object(s) that you've highlighted above.
- Move the mouse leftward, rightward, up, and down, and click to place the dimensions in the best available space.
- With the dimensioning object still selected, if necessary you can edit its attributes in the Presets palette to make it stand out better against the rest of the illustration. You can also edit its other properties in the Properties Bar.
- Select the Annotation Notes - Basic tool (Window | Toolbox | Markup Tools | Annotation Notes - Basic).
- Click on or near your second highlighted object (the one you highlighted with the Smart Vector Fill tool), and click a second time to place the Annotation label.
- The Annotation label text will be selected and you can enter text. You can also format the text in the Properties Bar, or change its Fill Ink in the Presets palette. Additionally, you can select the annotation's connecting line and edit its attributes in the Presets Palette, or change its other properties in the Properties Bar.
- Select the Text tool (Window | Toolbox | Text | Text Tool) and type a heading for your illustration.
- Still using the Text tool, click + drag to select the text and then edit its size and style in the Properties Bar, and its attributes in the Presets Palette.
- With the Selection tool (Window | Toolbox | Selection Arrows | Selection Tool) click + drag on the text to adjust its position, as required.
Tip:
- You can edit the notation text in a dimensioning object to say anything you want (it's easiest to do this immediately after placing). Select the dimension object and enter text in the Value, Prefix, or Postfix fields in the Properties Bar (or choose from other options).
Step 5: Importing a Raster Image & Editing its Opacity.
As with Canvas' native CVX file format, CGM files can also contain both vector objects and raster images. Now we're going to import an image (in this case, the ACD logo). That way we'll have a mix of object and image graphics in the same CGM document prior to experiencing Canvas' CGM export options.
To import an image:
- Click Image | Import, find a raster image (any TIFF, JPEG, or BMP, for example), and click Import.
- Adjust the image's size manually by clicking + dragging on its handles, and its position by click + dragging on the image itself.
- In the Properties Bar (with the image still selected) choose an Opacity of 40% (we want our logo to simulate a "semi-watermark" effect).
Step 6: CGM Exporting - the Camera Tool
 Now let's use the Camera Tool to quickly create a raster image "snapshot," in other words a rendered copy of our illustration for use in other applications such as Microsoft PowerPoint presentations, or Word documents.
To render an image with the Camera Tool:
- Choose the Camera Tool (Window | Toolbox | Camera Tool).
- Click + drag across the portion of the illustration that you want to render into an image.
- If necessary, pull on the box's white handles to adjust the image's boundaries.
- Click within the box, which will open the Render Image dialog box where you can choose the image's resolution, dimensions, and other options.
- Click OK.
- With the Camera Tool's "snapshot" image still selected, you can Copy-Paste it into many other applications, or you can save the selected image by clicking File | Save As, and in the dialog box selecting Save Selection.
Tips:
- In the Render Image dialog box the default resolution is 72 dpi (standard for web presentation), but you may want to increase this to 300 dpi (standard for printing, and a more flexible option if you intend to edit the result or use it in other applications). Or you can choose an even higher resolution for certain uses (if the rendered image is at all fuzzy, then increase the resolution).
- After you click OK, you might think that nothing's happened if you're using the Camera Tool for the first time. This is because the image you've created is placed immediately over top of the region you selected. Click + drag on the "snapshot" image to reveal its existence.
Step 7: CGM Exporting to PDF
 Exporting a CGM illustration from Canvas to PDF is Easy.
To save a CGM illustration as a PDF:
- Click File | Save As to open the Save As dialog box.
- From the Save as type drop-down list, select PDF-Acrobat.
- Click Save.
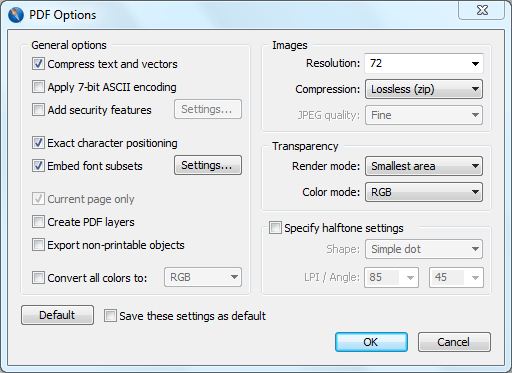
- In the PDF Options dialog box, choose from a variety of settings (if in doubt, click Default in the bottom-left corner). You can customize this by choosing your dialog settings and then selecting Save these settings as default).
- Click OK.
Tips:
- In the PDF Options dialog box, pay special attention to Embed font subsets | Settings to ensure fonts turn out the way you want them to; and to the Resolution (if in doubt choose 300 dpi, or experiment to find the best combination of quality PDF image + low file size).
- For further options, open the resulting PDF file in Adobe Acrobat.
Step 8: CGM Saving
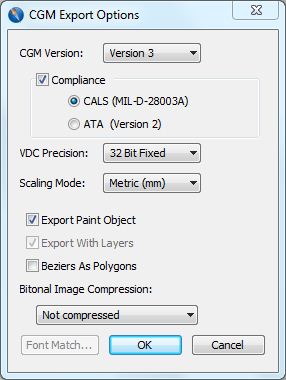 If you're working on a CGM file in Canvas while retaining its CGM format, each time you save it the CGM Export Options dialog box will appear.
To Save a CGM file to CGM format:
- Save your file (File | Save). The resulting dialog box will include the same options you chose last time, so if you have no changes simply click OK (or press Enter).
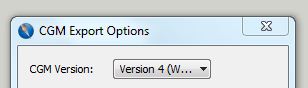
- If you do need to edit the CGM Export Options dialog options, you can:
- Choose from the CGM Version drop-down list (for Version 4-WebCGM, please see below).
- Select either CALS standard or ATA standard Compliance, depending on the industry context or workflow where the CGM file will be used.
- Choose from the VDC Precision drop-down list, which offers both 16 Bit Integer and 32 Bit Fixed settings (the level of precision required with your CGM file).
- Click on the Font Match button to ensure you have full control over how fonts will appear.
- Click OK.
Note: in the CGM Export Options dialog, the Bitonal Image Compression is greyed-out unless you're creating a WebCGM file.
Step 9: Exporting from CVX to CGM
 If you converted your CGM file to Canvas' native CVX format in order to work on it in Canvas, you can easily convert it back to CGM format for continued work in other CGM applications.
To export CVX files to CGM format:
- Choose File | Save As.
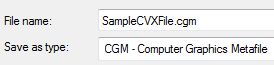
- In the Save As dialog choose CGM - Computer Graphics Metafile from the Save as type drop-down list.
- Click Save, and the CGM Export Options dialog box will open:
- Choose from the CGM Version drop-down list (for Version 4-WebCGM, please see below).
- You can also choose CALS or ATA standard Compliance, depending on the industry context or workflow where your CGM file will be used.
- Chose either 16 Bit Integer or 32 Bit Fixed from the VDC Precision drop-down list (the level of precision required with your CGM file or workflow).
- Click on the Font Match button to control how fonts will appear.
- Click OK.
Note: the Bitonal Image Compression is greyed-out unless you're creating a WebCGM file.
Step 10: Exporting to WebCGM
 You can export to WebCGM whether a file is in its original CGM format, or has been converted into Canvas' native CVX format. Simply choose the CGM 4 - WebCGM option in the CGM Export Options dialog.
To Save your file to CGM:
- Choose File | Save As.
- In the Save As dialog, choose CGM - Computer Graphics Metafile from the Save as type drop-down list. At this point, if you've continued to work in CGM format (elected not to convert the file to CVX), then we suggest that you change the file's name BEFORE you click Save; or, you can decide to keep the same name and overwrite the original CGM file; if you've converted to CVX then re-naming isn't necessary.
- Click Save.
- In the CGM Export Options dialog box, choose Version 4-WebCGM from the CGM Version drop-down list.
- Choose your preferred form of compression from the Bitonal Image Compression drop-down list.
- Choose your other CGM Export options (see above), and click OK.
Canvas' rich graphics environment offers many more capabilities that apply to CGM file preparation. Our other Canvas tutorials offer more helpful information for your CGM workflow.