Creating a Process Flowchart
Steps:
- Setting up a New Document
- Creating your Flowchart
- Adding Labels to your Symbols
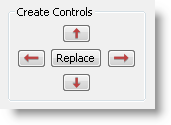
- Replacing Symbols
- Aligning and Adjusting Flowchart Elements
Introduction:
A flowchart can be used to illustrate the sequence of operations to be performed in order to get to the solution of a problem. Flowcharts can facilitate communication and play a vital role in planning and understanding the logic behind complex operations.
Canvas offers a wide variety of standard and unique symbols. In this tutorial we are going to show you how to use the Flowchart palette to create functional flowcharts representing a sequence of the steps, and the relationships among them.
Step 1: Setting up a New Document
To set up your document:
- Click File | New.
- Under Type of Document, select Illustration.
- Select Letter from the Paper drop-down list and click the Landscape button.
- Click the Paper Color drop-down list and select the multi-colored square at the top right to define a custom color.
- In the Color Editor dialog, choose RGB as a color type, then use the sliders to create a custom color. In our example, we used Red: 193, Green: 203, and Blue: 207.
- Click OK.
To return to this dialog box at anytime, click Layout | Document Setup.
Step 2: Creating your Flowchart
 To create
your flowchart:
To create
your flowchart:
- Set the default Pen ink and Fill ink color from the Toolbox. For this tutorial we used a black pen and a white fill.
- Select Window | Palette | Flowchart.
- From the to the Flowchart palette, scroll through and select a symbol and drag it into your document. In this tutorial we are going to start with the Process symbol.
- Select your default Smart Line Attributes (branch preferences) from within the Flowchart palette.
- Add additional symbols for your flowchart by doing one
or more of the following:
- For one branch, click a red arrow direction button.
- For two branches, click a blue arrow direction button.
 Tips:
Tips:
- Enter width and height measurements for your selected symbol into the Properties bar for precise dimensions.
- To add more than two branches to a symbol, select a symbol at the end of a branch and click a red arrow direction button, then SHIFT+click to select both the branch and the symbol and move it into position alongside the other two branches.
- To change attributes of your flowchart symbols or branches, select one or more of the objects and set the pen, fill, dash, and arrow attributes in the Toolbox. As with any Canvas object, you can also change the size of the selected symbols, the opacity, and effects such as bevel and shadow. You can also align symbols, rotate them, or skew them.
Step 3: Adding Labels to your Symbols
To add text to symbols and lines:
- In the document, select the symbol or line that you want to add text to.
- Select the Selection tool from the Toolbox.
- Type the text you want to add.
You can edit the text, change the font, size, color and other attributes as you would for any text you enter in Canvas.
Tips:
- Delete any symbols you do not want by selecting them and pressing the Delete key.
- Adjust the positioning of your symbols and see your lines dynamically follow.
Step 4: Replacing Symbols
 One way to illustrate the relationships between the nodes in
your diagram is to use different symbols to represent distinct
groups. For example, electronic nodes may be represented with
one shape and mechanical, with another.
One way to illustrate the relationships between the nodes in
your diagram is to use different symbols to represent distinct
groups. For example, electronic nodes may be represented with
one shape and mechanical, with another.
After reviewing your flowchart, you may want to replace some of your symbols with new ones to demonstrate the similarities and differences among them.
To replace one symbol with another:
- Select one or more symbols in your document to replace.
- In the Flowchart palette, select the symbol you want to replace it with.
- Click the Replace button in the Flowchart palette.
Step 5: Aligning and Adjusting Flowchart Elements
To align symbols in your flowchart:
- SHIFT+click two or more symbols.
- Select Windows | Palettes | Align.
- Click the Vertical Align Top button.
- In the Align to drop-down list, select Key Selection Object.
- Click Apply.
To align your entire flowchart to the page:
- Press Ctrl+A to select all.
- Press Ctrl + G to group your objects into one object group.
- In the Align palette, click the Vertical and Horizontal Align Centre buttons.
- In the Align to drop-down list, select Document.
- Click Apply.