Adding Links to your Parts Catalog
Steps:
- Linking to a Website
- Linking to Objects or Pages within your Catalog
- Linking to an Email Address
- Adding Hotspots for PDFs
- Saving your Parts Catalog as a PDF
Introduction:
Assigning hyperlinks to page elements is a quick and easy way to direct viewers of your document to more information. Hyperlinks can be used to:
- link to an external or internal website
- create connections to pages or objects within your project
- provide quick access to an email address
- add hotspots to graphics for documents exported to PDF
Step 1: Linking to a
Website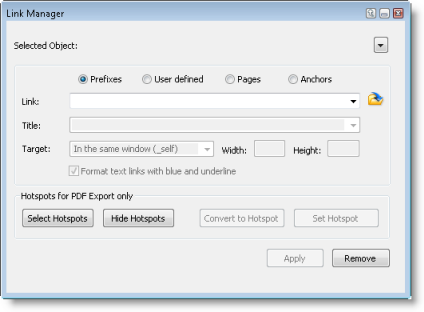
To begin, select the page element, such as descriptive text, that you want to hyperlink and then open the Link Manager palette.
To open the Link Manager Palette:
- Click Window | Palettes | Link Manager.
The Link Manager dialog box will present you with 4 radio buttons. Choose Prefixes to select from a list of predefined prefixes. For example, if you are linking to an external website, you will likely want to start out with http://www.
- Select the page element, such as descriptive text, that you want to hyperlink.
- Click Window | Palettes | Link Manager to open the Link Manager palette.
- The Link Manager dialog box will present you with 4 radio buttons. Choose Prefixes to select from a list of predefined prefixes. For example, if you are linking to an external website, you will likely want to start out with http://www.
- Enter the remainder of the website path into the Link field.
- If you would like a title for this link to render when a user mouses over the link, enter this text into the Title field.
- Under Target, select how you want your window displayed. If you are linking to an external website it's a good idea to select In a new window.
- Click Apply.
Step 2: Linking to Objects or Pages within your Document
You can define anchors for objects such as vector objects, text objects and image objects and then link to them from other areas of your document.
To define an anchor:
- With the Selection tool, select the object to which you want to assign the anchor.
- In the Link Manager palette, click the drop-down arrow menu at the top right and select Define Anchor .
- In the Define Anchor dialog box, enter a name for the anchor and click OK.
- You can then select the anchor from the Link drop-down
list when the Anchors radio button is selected.
 Tip:
If you redefine an anchor, make sure you
select the Replace existing anchor check box.
Tip:
If you redefine an anchor, make sure you
select the Replace existing anchor check box.
To link to a page within your document:
- Select the page element, such as descriptive text, that you want to hyperlink.
- In the Link Manager palette, select the Pages radio button to link to another page within your document.
- If you would like a title for this link to render when a user hovers over the link, enter this text into the Title field.
- Under Target, select how you want your window displayed. When linking to a page within your document it is best practice to select In the same window.
- Click Apply.
Step 3: Linking to an Email Address
To link to an email address:
- Select the contact name that you want to hyperlink.
- In the Link Manager palette, select mailto to link to another page within your document.
- If you would like a title for this link to render when a user mouses over the link, enter this text into the Title field.
- Under Target, select how you want your window displayed. When linking to a page within your document it's a good idea to select In the same window.
- Click Apply.
Step 4: Adding Hotspots for PDFs
You can select and add a link to an image as you would for other objects in Canvas, but if you would like to add more than one link to an image, then using the Hotspots feature will allow you to do so.
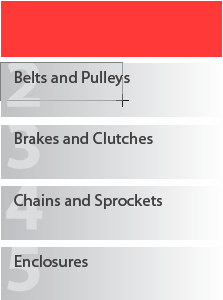
For example, if your parts catalog has a menu image that you want to divide into links, you can use the rectangle tool to divide up the graphic into hidden hyperlinked sections.
To create Hotspots with a shape tool:
- Select a shape tool, such as the rectangle tool, from the toolbox. Don't worry about the color of your shape as we are simply defining a linkable area with a hidden shape.
- Define an area on the image where you want the first link.
- In the Link Manager, click Convert to Hotspot.
- Check the Pages radio button and select the page you want to link to from the dropdown list.
- Select the Target: In the same window (_self).
- Continue with steps 1 - 4 above to add more hotspots to your graphic.
Step 5: Saving your Parts Catalog as a PDF
With your links in place you are ready to save your Parts Catalog as a PDF.
To save as a PDF:
- Click File | Save As.
- In the Save As dialog box, select PDF
from the Save as Type drop-down list.
- Enter a name for your PDF catalog and click Save.
- If you would like to change any of the defaults in the PDF Options dialog, do so and then click OK.
Tip:
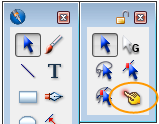
To test out your links prior to saving as a
PDF use the
Hyperlink pointer tool.