Importing and Exporting an Object’s Geometric Data
Steps:
- Creating a New Illustration
- Drawing a Vector Object
- Viewing the Object's Geometric Data
- Exporting the Object's Geometric Data
- Importing the Object's Geometric Data
Introduction
This tutorial shows you how to export mathematical data that numerically describes an object’s exact geometry. You'll learn how to create a simple vector object, and then export its geometric data to a text file. You'll also learn how to import geometric data from a text file.
Step 1: Creating a New Illustration
For this tutorial we'll create a new illustration document.
To create a new illustration:
- Click File | New.
- In the New Document dialog box, under Type of Document, select Illustration.
- Click OK.
Step 2: Drawing a Vector Object
Next we'll draw a simple oval vector object to use as an example.
To draw a vector object:
- Click the Oval drawing tool in the Toolbox.
- Click in your document and drag the cursor to draw an oval.
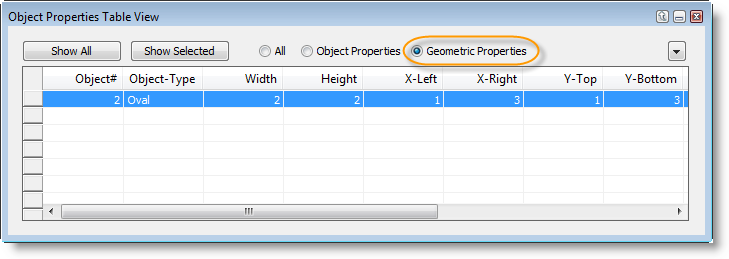
Step 3: Viewing the Object's Geometric Data
Before we export the geometric properties, we can view them in Canvas in the Object Properties Table View palette.
To view geometric properties:
- Select the oval object.
- Choose Object | Object Properties Table View.
- In the Object Properties Table View palette, select Geometric Properties.
- Click the Show All button to see all the geometric properties for
the object.
![]() Tip:
Use the scrollbars to see additional properties for the selected
object.
Tip:
Use the scrollbars to see additional properties for the selected
object.
Step 4: Exporting the Object's Geometric Data
We've created an object and viewed its geometric properties. Now we will export the geometric data to a text file so that it's available for use in other applications or other Canvas documents.
To export geometric data:
- Select the oval object.
- Choose Path | Geometric Export.
- If you are prompted about exporting the selected objects only, click Yes.
- In the Geometric Export Options dialog box, under Object Type to Export, select Oval, then click OK.
- In the Geometric Export dialog box, select the location
where you want to save the file, type a file name, then click Save.

![]() Tip:
If you prefer, you can save the data as a .CSV file. In the
Geometric Export dialog box, select All Files in
the Save as type drop-down list, and change the
file extension to .csv.
Tip:
If you prefer, you can save the data as a .CSV file. In the
Geometric Export dialog box, select All Files in
the Save as type drop-down list, and change the
file extension to .csv.
Step 5: Importing the Object's Geometric Data
If you have a text file containing an object's geometry, you can import it into Canvas. Since we have just created a text file containing the geometric data for an oval, we can import that into a new Canvas document to see how it works.
To import geometric data:
- Create a new Canvas illustration.
- Choose Path | Geometric Import.
- In the Geometric Import Options dialog box, select the file that you just created for the oval object. Make sure that the Object Type to Import is set to Oval, then click OK.
- When the confirmation message is displayed, click
OK.
The oval object is imported into the new Canvas illustration with its precise geometric data.

You now know how to create a simple vector object and view its geometric properties. You can also export geometric data to a text file, or .CSV file, and then import the file into another application or a new Canvas document.