Creating a PDF from your Canvas Document
Steps:
Introduction:
PDF (Portable Document Format) is a popular file format used for
print and web. You can create documents such as catalogs, brochures,
fliers, and annual reports in Canvas and then save them as PDF files
to send to the printer or add to your website.
In this tutorial, we’ll create a catalog and save it as a PDF
document. We’ll use master pages for a consistent background, and
create customized pages with text, graphics, and hyperlinks to
create a visually rich PDF that can be printed or posted online.
Step 1: Setting up the Document
To set up your document:
- Click File | New.
- Under Type of Document, select Publication.
- Select Letter from the Paper drop-down menu and inches under Document units.
- Click the Paper Color drop-down menu and select the multi-colored square at the top right to define a custom color.
- In the Color Editor dialog, choose RGB as the color type, then use the sliders to create a custom color. In our example, we've used Red: 212, Green: 216, and Blue: 232.
- Click OK.
To return to this dialog box at anytime, click Layout | Document Setup.
Step 2: Preparing the Master Page
Master pages are unique because objects on the Master Page appear on every page in the document. To maintain a consistent look and feel you can add branding elements to the Master page such as a background design and logo.
To begin, it's a good idea to add some guidelines to help organize the layout of the Master page.

To add guidelines:
- Click Layout | Document Layout to open the Document Layout palette.
- Expand the Master Page and click Layer #1.
- If your rulers are not visible, press SHIFT+F11. This keyboard shortcut toggles the rulers on and off.
- Click and drag from the horizontal ruler and then the vertical ruler to drag two guidelines onto the page.
- Double-click on the horizontal guideline to open the Guides dialog box.
- Enter 0.5 into the Guide position field.
- Click OK and do the same for the vertical guideline.
- Drag a second horizontal guideline from the ruler and enter 10.5 into the Guide position field.
- Drag a second vertical guideline and enter 8.
Now you have 4 precise guidelines to help organize your layout.
Next we are going to add some custom shapes to our Master page. To create these custom shapes, we'll use the Curve tool from the Toolbox.
To add a custom shape with the Curve tool:
- Select the Curve tool from the Toolbox.
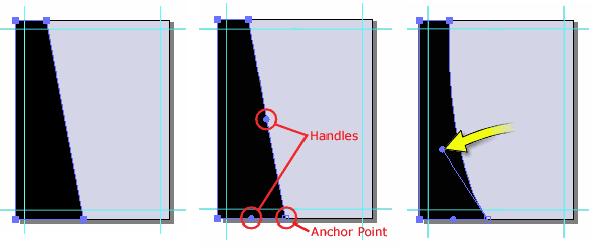
- Click the top left corner of your document to add an anchor point. The anchor point will appear as a small blue square.
- Using the same technique, add a few more anchor points as shown in our example.
- To complete the object, click on the starting anchor point.
 Tips:
Tips:
- If you place an anchor point by mistake, you can easily remove it by pressing the Delete key.
- Anchor points automatically turn into empty blue square outlines when they are selected for use.
Next, we want to give the object a rounded transition or swoop.
To add a swoop to the object:
- With the Selection tool, right-click on the bottom right anchor point and select Add Handle from the context menu.
- Click the object again and the handles will appear as small blue circles (as shown in the middle image below).
- Drag the handle inward to give the object a rounded appearance.
![]() Tip: To quickly move your canvas around as needed, temporarily activate the
Hand tool by pressing the space bar.
Tip: To quickly move your canvas around as needed, temporarily activate the
Hand tool by pressing the space bar.
Now let's give our object a transparent effect.
To add a transparent effect:
- Double-click your object to select it.
- Select Windows | Palettes | Transparency to open the Transparency palette.
- Drag the opacity slider to around 50%. Your object should look like the example below.
- Using the same techniques outlined above, add another object to complete the design as we have in our example. Be creative and have fun!


Next we'll add a logo to complete our Master page.
To add a logo:
- Click File | Place to open the Place dialog box.
- Browse to your logo and click Place.
- Click the position on the Master page where you want the logo to appear.
Step 3: Creating Catalog Pages
Now we are going to start working on the pages of the document. To keep your project organized, Canvas separates the objects on your pages into rows in the Document Layout palette. Double-click a layer or object in this palette and enter a descriptive name to make it easier to locate, or select and hide various components.
To insert a page:
- If your Document Layout palette is not open, click Windows | Palettes | Document Layout.
- Click the New Page icon and add 4 new pages.
- Enter descriptive names for your pages by double-clicking each page to open the Options dialog box.
To create a text box:
- Select a page from the Document Layout palette.
- With the text tool drag a rectangular area on the page where you want to enter your text. You can use the guidelines created above as markers for the maximum width of your textbox.
- Enter your text and it will be constrained to the predefined area.
![]() Tip:
You can select your text and double-click the Text tool
in the Toolbox
to
open the Type palette to set your
type
preferences.
Tip:
You can select your text and double-click the Text tool
in the Toolbox
to
open the Type palette to set your
type
preferences.
To import and align images:
- Select Image | Import.
- Browse to your image and click Import.
- Move this image to the right side of the document. Don't worry if it is overlapping the text for now.
- Add a couple more images and roughly align one above another.
- Select all the images and click Window | Palettes | Align.
- In the Vertical section of the Align palette select one of the spacing options under Distribute. This will ensure your images are aligned with equal spacing between them.
- In the Horizontal section, click the right align option to perfectly align your images.
- Click Apply.
 To add spacing around your images:
- Select the text and the images you just added by pressing Ctrl and clicking each element the Layout Document palette.
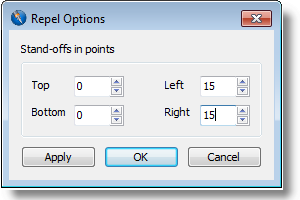
- Select Text | Wrap | Repel Options.
- Enter 15 in the Left and Right fields.
- Click OK.
![]() Tip:
Try moving an image around on the page. Notice how the text wrapping adjusts
to reflect the new placement.
Tip:
Try moving an image around on the page. Notice how the text wrapping adjusts
to reflect the new placement.
To link to a website:
- Select the image or text that you want hyperlinked.
- Select Windows | Palettes | Link Manager
- Enter the Link and Title.
- Click Apply and close the dialog box.
To link to another page within your document:
- Select the image or text that you want hyperlinked.
- Select Windows | Palettes | Link Manager
- In the Link Manager palette, select Pages.
- From the Link drop-down list, select the page you want to link to.
- Click Apply and close the dialog box.
Step 4: Saving your file as a PDF
 Now that we've created our catalog, we can save it as a PDF
for printing or to post on a website.
Now that we've created our catalog, we can save it as a PDF
for printing or to post on a website.
To save your file as a PDF:
- Click File | Save as.
- Browse to the location where you want to save your file.
- Select PDF from the Save as type drop-down menu.
- Name your file and click Save.
- If you plan to use the PDF online, then a lower resolution, such as 72 px, will ensure a faster download time. However, if you plan to use the PDF for print, then select a high resolution for better print quality.
- Click OK.
With the completion of this last step, you now have all the ammunition you need to create stunning PDF catalogs that are also useful and convenient to your customers.
![]() Tip: To open a PDF within Canvas to continue editing, select Preserve Canvas editing capabilities.
Tip: To open a PDF within Canvas to continue editing, select Preserve Canvas editing capabilities.