Precision Drawing and Advanced Dimensioning
Steps:
- Preparing the Document
- Drawing an Object to a Predefined Size
- Adding Measurements to your Illustrations
- Adjusting Attributes and Properties
Introduction:
Canvas is used worldwide by professional engineers and designers
for schematics, blueprints, and other types of drawings. When
creating complex technical illustrations, it sometimes may be
necessary to work with scaled objects. To help with this task,
Canvas lets you set the scale and measurement units of your
technical illustrations. Canvas also has a wide array of
Dimensioning tools to let you create visible measurements. In
this tutorial, we‘ll show you how to go about setting up Canvas
for precision drawing and walk you through a few commonly-used
Dimensioning tools.
Step 1: Preparing the
Document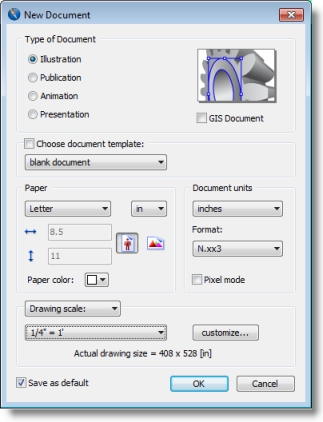
For this tutorial, we’ll create a new illustration using inches as the document units and ¼”=1’ as the scale. We also show the rulers, and make the horizontal and vertical dimensions of objects visible as you draw them.
To create the new Canvas document:
- Click File | New.
- In the New Document dialog box, select Illustration under Type of Document.
- Under Document units select inches.
- From the scale drop-down list, select Drawing scale and then select 1/4" = 1'
- Click OK.
To make the rulers visible:
Click Layout | Display |
Show Rulers. (SHIFT+F11)
The rulers will appear across the top and side of the
Canvas work area.
If at any time you decide you would like to change the
document units, you can right-click anywhere on
the ruler and select Show Ruler Dialog
from the context menu.
To make the dimensions visible as you draw:
Click Layout | Display | Show Size.
Step 2: Drawing an Object to a Predefined Size
Now that we‘ve finished preparing our document, we are ready
to start drawing. For the first example, we’ll draw a basic
circular object.
To draw a circle:
- Select the Oval tool from the Toolbox.
- Click the Pen Ink icon and select black to make your outline black.
- Click the Fill Ink icon and select no color to leave your circle as an outline.
- Draw a 24-inch perfect circle by pressing SHIFT and dragging the crosshair diagonally. To ensure an accurate size, refer to the object dimensions that appear when you drag the crosshair.
If your circle is not precisely the correct size, you can enter the size directly in the Properties bar or the Object Specs palette.
To enter the object dimensions directly:
- Select the object; in this case a circle.
- Click Object | Object Specs (CTRL+I) to bring up the Object Specs dialog box.
- On the Data tab, select Dimension from the drop-down menu
- Select the Keep Proportions checkbox.
- Enter 24 into the Width field.
- Click Apply and close the palette.
Step 3: Adding Measurements to your Illustrations
Linear Dimensioning
 Using the Dimensioning tools, you can add
visible measurements to
your illustrations. Canvas has several different Dimensioning
tools at your disposal. To open the Dimensioning tools,
select the Linear Dimensioning tool from the
toolbox.
Using the Dimensioning tools, you can add
visible measurements to
your illustrations. Canvas has several different Dimensioning
tools at your disposal. To open the Dimensioning tools,
select the Linear Dimensioning tool from the
toolbox.
We are going to add a horizontal measurement to the 24" circle we created.
To add a horizontal linear measurement:
- Select the Linear Dimensioning tool.
- Click the left edge of the circle to mark the starting point, and then move horizontally across and click the other side.
- As you move the cursor away, you will see the measurement appear.
- Double-click to enter the measurement in place.
Radius Dimensioning
The radius of a circle is a very common measurement used in
technical drawings. So for the next step, we are going to look
at measuring the radius of our circle.
To add a radial dimension:
- Select the Radius Dimensioning tool.
- Click anywhere on the circle. A radial measurement will appear originating from the center of the circle with the measurement displayed in the unit of measurement you selected in step 1.
- Drag the cursor out of the circle and click to create an anchor point. The finished radius dimension will appear like our example.
Note: Since the dimensions are not attached to the objects they measure, dimensions do not change when you resize objects you have measured. However if you group a dimension and an object (Object | Group), when you resize the object, the dimension changes accordingly.
Baseline and Chain Dimensioning
Baseline and chain dimensioning tools allow you to make multiple measurements. Baseline dimensions are a series of inclusive measurements made from one shared starting point. Chain dimensions are a series of individual measurements one after another in a row.
For this example, we will begin by drawing an L-shaped room.
To create a polygon:
- Select the Curve tool from the toolbox, then select the Polygon tool.
- Press the SHIFT key and click the corners of your visualized room (pressing the Shift key ensures straight lines).
- Adjust the outline (Pen Ink) and Fill (Fill Ink) to suit your preferences.


With our object in place, we can begin to add horizontal baseline measurements.
To add a chain or baseline measurement:
- Select either the Baseline or Chain Dimensioning tool.
- Click on the starting point of your measurement, and then move horizontally across and click the other side for your first measurement.
- Drag the measurement away from the object and click the cursor once to create an anchor point.
- Click on the next point you want to measure as instructed by the prompt.
- Again drag the measurement away from the object and click the cursor to establish the anchor point.
- Double-click to complete your measurement.
Your resulting horizontal measurement should look similar to the Baseline or Chain Dimensioning example below.
Step 4: Adjusting Attributes and Properties
Adjusting the Attributes and Properties of your displayed measurements allows you to have more control over your final output.
To adjust the color of the dimensions:
- Select a linear dimension (SHIFT+click to select more than one).
- Select Window | Palettes | Attributes.
- In the attribute palette, on the Ink tab, make sure the Pen Ink icon is selected and click a color from the color bar, or enter in the RGB values directly.
- The color will update automatically.
To adjust the placement and font of dimension text:
- On the Properties bar, click the blue arrow icon on the far right to scroll to the next screen.
- From the Text Display drop-down list, select Above. Note where the measurement now sits in relation to the lines of measurement.
- From the Font drop-down list, select Verdana.
- Under Style, size 9 bold.
Play around with other adjustments to investigate further preferences the Attributes palette makes possible. Also, experiment with manually adjusting the measurement specs in the Properties bar.
Using the steps learned in this tutorial, anyone can easily put together technical drawings with precise measurements.