Using the Symbol Library
Steps:
- Setting up a New Document
- Using Prinstalled Symbols
- Editing Symbols
- Creating your own Symbols
- Searching and Replacing Symbols
Introduction:
To demonstrate the use of symbols in Canvas, we are going to show you how easy it is to add and arrange objects such as furniture within an office floorplan. Planning the layout of furniture ahead of time ensures everything fits within the space available before going to the effort of physically arranging it. We will use symbols that match the measurements of each piece of furniture, allowing us to simply click and drag these pieces from our library without having to draw them each time.This tutorial will show you how to access and modify a variety of preinstalled symbols from the Symbol Library and how to make any vector object or group reusable by exporting them into your own symbols.
Step 1: Setting up a New Document
Begin by taking notes of the measurements of your furniture and floorplan. With these dimensions in hand, you are ready to prepare your document.
To set up your document:
- Click File | New.
- Under Type of Document, select Illustration.
- Under Document units, select feet.
- Under Format, select N.x2.
- Select Drawing scale from the scale list and select 1" = 1'.
- Click the Landscape icon.
- Click OK.
If your Document Layout palette is not already open, select Window | Palettes | Document Layout. This palette is the control center for your sheets, layers, and objects and can be used to add, delete and move items.
To draw the floorplan:
- Turn your Grid layer on by selecting the Grids check box in the Properties bar (be sure it is set to visible in your Document Layout palette).
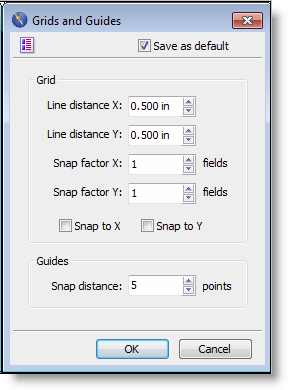
- Select Layout | Grids and Guides and deselect Snap to X and Y as shown in the image to the right and click OK.
- In the Toolbox select black for the pen ink, and no fill for the fill ink.
- Select the Curve tool from the toolbox and select the Polygon tool to draw the rooms. Ensure your measurements are correct by referring to the Properties bar.
If you have used more than one polygon shape, select all (Ctrl+A) and group your objects (Ctrl+G).
 Tips:
Tips:
- Hold down the Shift key while drawing to keep your lines straight.
- To modify the length of a line, use the Select tool and drag the anchor point out further.
- To ungroup a group of object, click Ctrl+U.
- Toggle page rulers on and off by pressing the keyboard shortcut F11.
Step 2: Using Preinstalled Symbols
With your room laid out you are ready to begin adding furniture. The Symbol Library offers a variety of categories chock full of symbols you can quickly add to your document. These symbols can also be adjusted to match precisely the requirements of your project.
To use a symbol from the Symbol Library:
- Select Window | Palettes | Symbol Library.
- In the Symbol Library palette, select a symbol category, in this case Architecture.
- Select a symbol and drag it onto your sheet.
![]() Tip:
To scale the symbol while you place it,
Shift+drag the cursor to set a proportionate bounding box size.
Canvas scales the symbol to fit the bounding box. You can also
resize the symbol after it is placed by adjusting the
measurements in the Properties bar to match the
measurements of your furniture precisely.
Tip:
To scale the symbol while you place it,
Shift+drag the cursor to set a proportionate bounding box size.
Canvas scales the symbol to fit the bounding box. You can also
resize the symbol after it is placed by adjusting the
measurements in the Properties bar to match the
measurements of your furniture precisely.
Step 3: Editing Symbols
To edit a symbol:
- Select and ungroup the symbol you want to edit with the keyboard shortcut Ctrl+U.
- Modify the symbol by editing the individual objects.
- When you have finished editing, select all the objects and group them with the keyboard shortcut Ctrl+G.
To save your modified Symbol:
- Select Object | Export As Symbol.
- In the Browse For Folder dialog box, select a location for your symbols and click Make New Folder.
- Enter a name for your symbol folder and click OK.
- In the Name Symbol dialog box, deselect Automatic Naming and enter a descriptive short name for your new symbol.
- Click OK.
To link to your symbol folder in the Symbol Library:
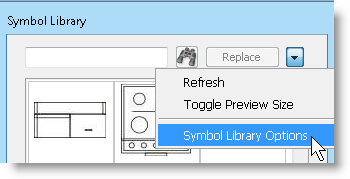
- Click the drop-down arrow in the Symbol Library palette and select Symbol Library Options.
- Click Add Path and browse to your path location.
- Click OK. Your Symbol folder is added under My Symbols in the Symbol Library palette.
Add other symbols from the Symbol Library that match the furniture you want to arrange in your room and set their measurements accordingly. If you have furniture that is not listed in the library you can also create your own.
Step 4: Creating your own Symbols
To create your own Symbol:
- Create an illustration of your piece of furniture using the drawing tools such as the Rectangle, Oval and Polygon tools.
- Refer to the Properties bar to review and enter precise measurements.
- If you have more than one object in your symbol illustration, SHIFT+click and select all objects, then press CTRL+G to group them. Note: Ensure Select Across layers is checked in the Properties bar.
- Select Object | Export as Symbol.
- In the Browse For Folder dialog box,
select the folder created in the steps above or make a new
folder and click OK.
Note: If you create a new folder, be sure to link to it in the Symbol Library palette as outlined above. - In the Name Symbol dialog box, deselect Automatic Naming and enter a descriptive short name for your new symbol.
- Click OK.
Create more symbols and simply drag them into the Symbol Library palette. Note: Be sure that your symbol library folder is selected.
Step 5: Searching and Replacing Symbols
Now let's say you have added all of the office furniture and have just been told that the desks are actually 2" deeper than was originally noted. Fortunately, this is a simple fix.
Revise an instance of your symbol by following the steps outlined in Step 3: Editing Symbols but this time instead of exporting it, click a line on your object (not the anchor points which will adjust the shape) and drag it into your Symbol Library preview to make it a symbol. Name this updated desk NewDesk.
Next we want to search for all cases of the desk on our floorplan. To do this we will use the Symbol Library Search and Select feature.
To search and replace a symbol in the Symbol Library:
- In the Symbol Library palette search field, type a search term, such as desk for our example.
- Click the Search icon. The desk symbol displays in the preview pane.
- Right-click the desk and select Search and Select to select all instances of the symbol. Shift+click any you do not want selected.
- Select a different symbol in your library, such as the new desk, and click Replace.