Technical Illustration
Steps:
- Setting up a New Document
- Adding Layers
- Placing the Image
- Tracing the Image
- Using the Handle and Tangent Lines
- Adding Finishing Touches
- Adding Text on a Path
Introduction:
Raster images, like digital photographs or scanned images, can have several inherent limitations such as pixelation, resolution, and file size. Vector illustrations on the other hand, are mathematically created and do not contain pixels. Vector images can be resized without losing image quality or detail, they are clean and sharp, and are generally of a smaller file size. One way to create your own vector illustrations is by tracing original raster images inside Canvas.
In this tutorial, we will show you just how easy it is to create vector illustrations from any digital photograph or scanned image. Follow along and learn how to quickly convert picture elements into technical illustrations.
Terminology
Anchor Points: The Anchor Point determines where a path begins and ends. During the vector editing process they will appear as small blue squares. However, they automatically turn into empty blue square outlines when they are selected for use.
Tangent Lines: Tangent Lines provide a visual reference during the editing process. They allow you to view how the shapes of curved segments are affected during editing.
Handles: A Handle is the control point that you use to move the Tangent Line.
Step 1: Setting up a New Document
As with any design project you will need to set up your workspace.
To set up your workspace:
- Click File | New to open a new document.
- Under Type of Document, select Illustration.
- Under Document units, select pixels.
- Click OK.
Step 2: Adding Layers
 Now that our
document is set up, we are going to add
an
additional layer to the sheet. Adding additional layers within a
sheet allows you to easily organize the various parts of an
illustration so that they can be quickly selected and edited
during the design process.
Now that our
document is set up, we are going to add
an
additional layer to the sheet. Adding additional layers within a
sheet allows you to easily organize the various parts of an
illustration so that they can be quickly selected and edited
during the design process.
Since this is going to be a relatively simple illustration, we are only going to have two layers. One layer will be used to contain the image we will trace. The other will function as a drawing area for the illustration.
To add layers to the sheet:
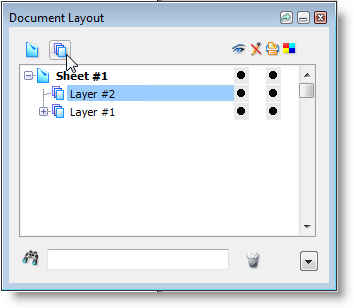
- Click Layout | Document Layout. Your palette will look like the palette on the right.
- Select the + sign next to Sheet #1 to expand the view and reveal Layer #1 and the Grid Layer inside.
- Click the new layer icon to add a second layer.
To name your layers:
- Double-click Layer #1 to bring up the Layer Options dialog box and enter Photo into the Layer Name field.
- Click OK.
- Double-click Layer #2 and enter Illustration into the Layer Name field.
- Click OK.
Step 3: Placing the Image
We are now ready to place the image that we want to trace.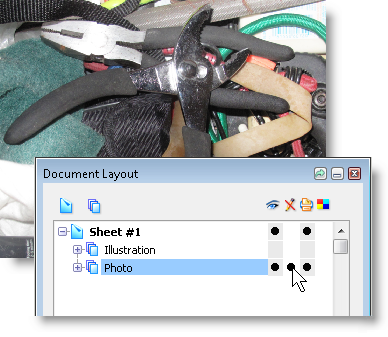
To place your image:
- Select the layer named Photo within the Document Layout palette. This will tell Canvas that this is the location that we have chosen to place our image.
- Click File | Place. Locate your image and click Place. Click in the document where you would like to place your image.
- Click the non-edit icon column for the photo to lock it and prevent accidently editing (see example).
Why it is important to place the photo on a different layer:
- When using the drawing tools, placing the photo on a different layer will prevent accidental changes to the original image.
- When your illustration is complete, you can simply click on the eye icon and make the Photo layer invisible. This allows you to instantly see and compare your illustration efforts with the original image.
- The original photo will be left unedited and could be used from its original state in the future.
Step 4: Tracing the Image
 To
enhance the accuracy of the tracing procedure, it is good practice
to select a bright pen ink color so that the outline will be easy to
see. You are free to go back and change these color settings after
you have finished your illustration.
To
enhance the accuracy of the tracing procedure, it is good practice
to select a bright pen ink color so that the outline will be easy to
see. You are free to go back and change these color settings after
you have finished your illustration.
To prepare your ink:
- Press the Esc key several times to ensure all of the objects are deselected.
- Select a lime green pen ink color to trace your image with.
- Click the fill ink icon and select the no fill option (the white box with a slash through it). This will allow you to trace without adding a fill color to your drawing.
To begin drawing:
- Select the Illustration layer.
- Click the Curve tool from the toolbox and choose the Auto Curve tool (as shown).
- Click on an edge of your object to set your first point and begin your curve. The anchor point will appear as a small blue square.
- Click again on your object a short distance from your first anchor point.
- Continue to click around your object to create a complete outline of the outer edge. Be certain to complete the path by clicking on the original starting anchor point.
Step 5: Using the Handle and Tangent Lines
Notice that your lines are not perfectly smooth. Using the handles and tangent lines, you can edit the vector curves to smooth and perfect your illustration.
To edit your vector object:
- Zoom into a section of your outlined object with the
Magnifying Glass tool.
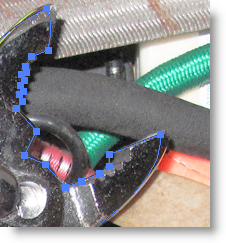
- If your drawing is not in vector-edit mode, double-click on the path. When you are in edit-mode, the anchor points will appear as small blue squares.
- With the Selection tool, click directly on an anchor point to reveal the tangent line.
- Use the Selection tool to select the handles of the tangent line and reshape the path to match the contour of your object. You can move the tangent line on one side only by holding down the Tab key while moving the handle.
If this is your first vector editing project, you might want to take a few minutes and experiment with this procedure.
 Tips:
Tips:
- You can draw and adjust as you go by using shortcuts to quickly switch back and forth between the Curve tool (shortcut key B) and the Selection tool (shortcut key V). Using shortcut keys such as B and V speeds up your workflow.
- To add or delete an anchor point, right-click on the path to bring up the context menu and select Add Point or Delete Selected Points.
- To quickly move your document around as you edit, temporarily activate the
Hand tool by pressing the
space bar. - With the Magnifying Glass tool, magnify an area to fill the screen by dragging a box around the area you want to magnify.
- Double-click the Magnifying Glass tool at any time to reset your view to 100%.
Step 7: Adding Finishing Touches
To add circular or rectangular shapes to your illustration:
- Click the Rectangle or Oval tool from the toolbox and draw your selected shape.
- Hold down the Shift key while dragging to create a perfect circle or square.
- Press the arrow keys to nudge your object into place one pixel at a time. For larger increments, hold down the Alt key (10pts) or the Ctrl key (50pts).
- Press Ctrl+Shift and then drag out a duplicate version of your selected object
To finalize your ink setting:
- With the Selection tool, click off to the side of your working area. From the Properties bar, ensure the Select Across layers check box is selected.
- Press Ctrl+A to select all.
- If all of your objects are not selected, make sure the Select Across layers option is checked in the Properties bar and any layers with illustrations are not locked in the Document Layout palette.
- With your objects selected, change the Pen Ink to black. Add a fill color if desired.
To hide the photo layer:
Under the visibility column (eye icon) in the Document Layout palette, click the black dot adjacent to the photo layer. This will hide your photo. Note, you cannot hide a layer if it is currently selected.
Step
7:
Adding Text on a Path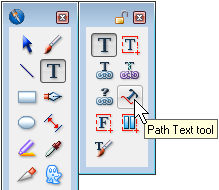
To help demonstrate the variety of tools at your disposal, we are going to write some text on a path to match the curve of our object.
To add text on a path:
- Zoom into a curved path where you would like to place your text.
- Select the Path Text tool.
- Click on a curved part of your object to bring up the text insertion point, and enter your text.
To adjust the text position:
- Click on the text using the Selection tool.
You will notice 3 red Bind Position
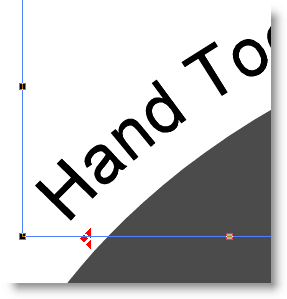 handles automatically
appear. These handles give you the ability to place the
text with professional precision and accuracy.
handles automatically
appear. These handles give you the ability to place the
text with professional precision and accuracy. - Use the Selection tool to select and move these position
handles to align the text where you want it in relation to
the path.
- Use the Reverse Flow Handle (the diamond) to switch the vertical orientation of the type.
- Use the Alignment Handle (top or far right triangle) to drag and adjust the text to a specific point along the path.
- Use the Baseline Shift Handle (bottom triangle) to change the elevation of the baseline relative to the path.
Congratulations! You‘ve successfully completed your vector illustration. If you found this project of interest, you might want to take a moment and review our other illustration tutorials.